Hi Guys,
Google poses very
strict usage policies on maps. Maps usage for commercial purpose needs
purchasing "Maps for Business" license, which costs approx $10,000
"Every Year".
However, if
in-case you want to build applications on Google maps using
JavaScript API V3, here is the solution. What's even better, build applications
using Google map tiles saved in your own server/local system. Hence, I will show you
how to build applications using offline Google maps with Google JavaScript
API V3.
Recipe:
1) Download Google
Map tiles.
2) Organize,
rearrange and rename downloaded tiles to be accessed by API.
3) Place the files
in your server's hosting space and generate a URL to access the same.
4) Use the same
URL in Google JavaScript API to use offline maps to build your application.
Ingredients:
1) Download
"Easy Google Maps Downloader" from this link here.
2) Download
"Bulk Rename Utility" from this link here.
3) Use this link to get find the latitude and
longitude values of any place in the Google world map.
4) Create a file
and give it a suitable name with ".html" extension. Ex. Test.html.
Lets Start
Cooking:
Open "Easy
Google Maps Downloader", after having downloaded. The tool looks something
like this:

This tool helps
download Google map tiles to your computer.
Its pretty simple to use. Give any crappy Task name, select the
type of Google Map you would like to download, decide the portion of map you
would like to download and fill in the appropriate latitude and longitude
values. Use this link to retrieve the
required latitude and longitude values. Filling the above latitude and
longitude details enables the tool to square up the portion to be selected for
download.

Select the
appropriate zoom level. The maps
above is for zoom level 8. Finally, select the path to which the tiles need to
be downloaded. So if in-case you want to download the entire world map, your
table values would look something like this:

Press start and
the map tiles will get downloaded to the given location.
But, what exactly
gets downloaded. Well, Google map consists of huge number of small image files, either JPEG or PNG files, called TILES, arranged in a proper order to form map. Number of tiles downloaded are different for
different zoom level and number of tiles increase exponentially with increasing zoom levels.

So roughly 4 tiles get downloaded for Zoom level 1 (world map split into 4 parts), 16 tiles for zoom level 2, 56 tiles for zoom level 3 and so on. Hence approximately 16,000 and 64,000 tiles get downloaded for zoom level 7 and 8 respectively.
Hence, download tiles for required portion of world map to the zoom level to wish your maps to zoom into. Download tiles for different zoom levels in different folders or paths if possible. Once downloaded, here comes the main part, so, follow these instructions carefully. The folder in which you would have downloaded the tiles contains one folder and four other files. You can just retain the folder and delete all the other files.

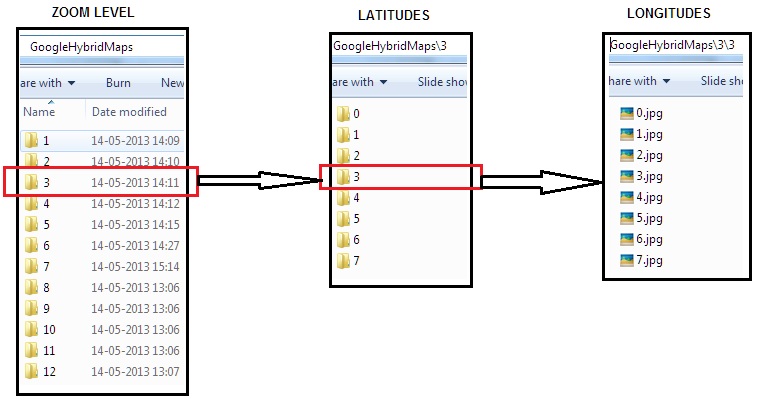
Now if you open the folder, you can all see the tiles downloaded for that particular zoom level. For all the tiles you have downloaded for a particular zoom level, please copy/cut the tiles and place the tiles in a folder named only with the zoom level. For example, as discussed above, you download 4 map tiles for zoom level 1. Place those four tiles in a folder named 1. Create folders names 2, 3, 4... in the same directory and place the tiles downloaded for zoom level 2, 3, 4... etc in the respective folders.
After, having placed the files in the appropriate zoom level named folders, now comes further segregation of tiles. Observe carefully the name of the tiles :
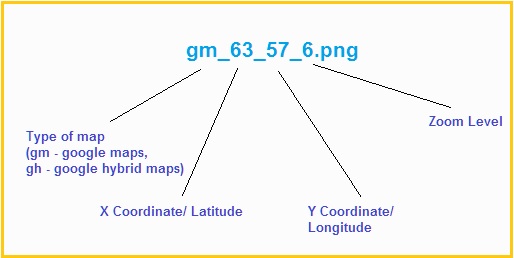
Since we have already segregated the files at zoom level, we can neglect the zoom level factor and type of map factor. Now, we need to segregate the tiles by latitude. So create separate folders for different latitudes and place the tiles concerning to particular latitude in that folder. For example, file names like gm_8_9_1.png and gm_8_55_1.png would be placed in folder named 8 (latitude), which in-turn would be placed inside an folder named 1(zoom level).
Now all we need to do is rename the tiles with the name of Longitudes. You may remove map type attachment gm, the latitude and zoom level's tagged along the name and leave only longitude name for the tiles. Your file structure should look something like this:
Sometimes, the number of tiles to be renamed to the name of longitude may be very huge. Hence use "Bulk rename utility" tool to rename such huge number of files at once. Below picture may help you grasp some basic idea on how it works:

As you can see, I have just used the high-lightened fields to remove the first 8 characters and last 3 characters to bulk rename the files to longitude name.
Once we have renamed all the tiles and arranged all the files in above mentioned order, we are ready with offline maps. Hence copy this parent folder containing all this files, example, GoogleRoadMaps or GoogleHybridMaps etc., to your server's hosting space and retrive an URL to access the same.
For Ex:
http://www.hostingspace.com/GoogleHybridMaps
Alternately if you are using local machine as a local host, you can use,
http://localhost/GoogleHybridMaps
Now, you can copy and paste the below code into your test.html file and you should be able to open google maps offline.
Hence, download tiles for required portion of world map to the zoom level to wish your maps to zoom into. Download tiles for different zoom levels in different folders or paths if possible. Once downloaded, here comes the main part, so, follow these instructions carefully. The folder in which you would have downloaded the tiles contains one folder and four other files. You can just retain the folder and delete all the other files.
Now if you open the folder, you can all see the tiles downloaded for that particular zoom level. For all the tiles you have downloaded for a particular zoom level, please copy/cut the tiles and place the tiles in a folder named only with the zoom level. For example, as discussed above, you download 4 map tiles for zoom level 1. Place those four tiles in a folder named 1. Create folders names 2, 3, 4... in the same directory and place the tiles downloaded for zoom level 2, 3, 4... etc in the respective folders.
After, having placed the files in the appropriate zoom level named folders, now comes further segregation of tiles. Observe carefully the name of the tiles :
Now all we need to do is rename the tiles with the name of Longitudes. You may remove map type attachment gm, the latitude and zoom level's tagged along the name and leave only longitude name for the tiles. Your file structure should look something like this:
Sometimes, the number of tiles to be renamed to the name of longitude may be very huge. Hence use "Bulk rename utility" tool to rename such huge number of files at once. Below picture may help you grasp some basic idea on how it works:
As you can see, I have just used the high-lightened fields to remove the first 8 characters and last 3 characters to bulk rename the files to longitude name.
Once we have renamed all the tiles and arranged all the files in above mentioned order, we are ready with offline maps. Hence copy this parent folder containing all this files, example, GoogleRoadMaps or GoogleHybridMaps etc., to your server's hosting space and retrive an URL to access the same.
For Ex:
http://www.hostingspace.com/GoogleHybridMaps
Alternately if you are using local machine as a local host, you can use,
http://localhost/GoogleHybridMaps
Now, you can copy and paste the below code into your test.html file and you should be able to open google maps offline.
<!DOCTYPE html>
<html>
     <head>
        <meta charset="utf-8" />
        <meta name="viewport" content="initial-scale=1.0, user-scalable=no" />
        <title>OpenStreetMap with Google Maps v3 API</title>
        <style type="text/css">
            html, body, #map {
                height: 100%;
                width:100%;
                margin: 0;
                padding: 0;
            }
            .main {
                position:relative;
                width:100%;
                height:100%;
            }
            .topButton {
                position: absolute;
                bottom:0;
                right:0;
                z-index:10;
            }
        </style>
    </head>

    <body onload="initialize()">
        <div id="map"></div>
        <div class="topButton">
            <button type="button" onclick="initialize()">Google Maps</button>
        </div>
        <script type="text/javascript" src="http://maps.googleapis.com/maps/api/js?sensor=false&libraries=geometry"></script>
        <script type="text/javascript">
            var element = document.getElementById("map");
            var map;
            var zoomParameter = 8;

            function initialize() {
                var mapTypeIds = [];
                for (var type in google.maps.MapTypeId) {
                }

                mapTypeIds.push("GoogleRoadMaps");

                map = new google.maps.Map(element, {
                    center: new google.maps.LatLng(29.442, 47.611),
                    zoom: 2,
                    mapTypeId: "GoogleRoadMaps",
                    mapTypeControlOptions: {
                        mapTypeIds: mapTypeIds
                    }
                });

                map.mapTypes.set("GoogleRoadMaps", new google.maps.ImageMapType({
                    getTileUrl: function (coord, zoom) {

                        return "http://hostingspace.com/googlehybridmap/" + zoom + "/" + coord.x + "/" + coord.y + ".png";
                    },
                    tileSize: new google.maps.Size(256, 256),
                    name: "GoogleRoadMaps",
                    maxZoom: 16
                }));
                }
                </script>
    </body>

</html>
I hope the above HTML code is pretty self explanatory. But, just in case you find any difficulty running through the code, kindly me let me know. I would provide an explanation for the same in the portion here.
Thanks guys. Have a good day.